I have been asked to do a little guide on how to make mini patchworks. This is my first tutorial so it may be lacking lol.
Anyway to begin
Firstly decide what size quilt, patches and shape you want. I would recommend for a beginner that you use a square patch rather than hexagonal as it gives you a nice straight edge at the end.
I usually use either 1cm squares or have now started using 1 inch squares which are a lot easier and quicker to work with, so we will use 1 inch squares for this. You will need to decide how big your finished quilt will be. With the larger patches I use 7 x 7 inches, or 9 by 9, but as 7 inches fits the width of the graph paper I would suggest you start with these.
Visit this site http://incompetech.com/graphpaper/ where you will be able to make and print your graph paper. Just select the A4 and 1 inch in squares, then print it off. If you want to do a rigid design you may want to run 2 sheets off, 1 to cut up and 1 to make your design on, I have to say I never bother with this as mine are always pretty random!
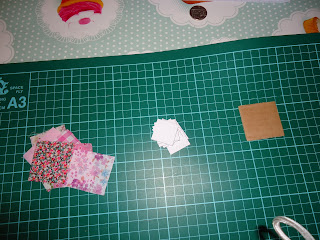
Anyway, once you've printed your graph paper, cut it into all the individual squares that you need. Also make a cardboard template slightly bigger than one of the squares to use as a guide for the material squares which will be bigger than the paper patches.
Using the larger template begin to cut out the squares of fabric, they don't need to be 100% accurate as they will be folded over the paper patches so don't worry if they're not perfectly straight and square.
You will end up with a large pile of patches and papers
Next it's time to tack the papers and fabric together. I know other people that use other methods which are quicker but I've never found them successful but that's probably just me, so feel free to try them. One way is to spray starch the fabric and fold it over the patches. Another way is to glue stick the paper patches and fold the fabric over. I have to say they've never worked for me, so I go to the more laborious route of tacking! Just roughly tack (with a completely different colour thread to make it easier when removing), folding over a small amount as you go. They really do only need to be tacked with a few stitches, just to keep the corners down.
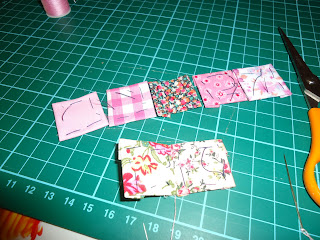
So now you should end up with a whole pile of tacked patches. Now it's time to begin sewing them together. Place 2 patches right sides together and using a colour thread that will blend in, begin oversewing on the very edge, trying not to sew the papers inside the patches, not easy and it isn't a disaster if you do catch the edge of the papers. To start off just do a few oversewing stitches just to secure the thread, then work along the edge of the patch, try and get as many patches sewn together using the same thread, if you're doing a random patchwork you can get quite a few. You can always do a couple of stitches back the other way to join another patch, just saves keep breaking the thread. When you come near the end of the thread just do a couple of stitches together to secure it.
The quilt comes together quite quickly at this stage and you'll end up with patches together something like this
When you've got them all sewn together to the size you want, it's time to get the iron out!
Give the quilt a quick iron, just to reinforce the folded corners really. Now it's time to take the tacking and papers out. This is fiddly but persrvere! It does make a mess with bits of cotton everywhere! But the end is in sight. When I've got the papers and tacking out I give it a very quick iron just to smooth it all out and keep those corners folded in.
You now have a nearly finished quilt!
To finish it, again there are many methods! I don't use any wadding in mini quilts as it makes them a bit too stiff. A very simple way is to just cut another piece of material the same size as your finished quilt and right sides together sew them together, just leaving enough room to turn it right side out and then ladder stitch the opening together.
The method I use, I found here. Rather than writing it all again, just visit this blog. It's for a full size quilt but it's exactly the same for a mini quilt, just easier and smaller! Just adjust the amount of fabric needed for the turnover, you won't need much as the quilt is quite small.
http://prudentbaby.com/2011/11/by-craft/the-easiest-cheat-for-binding-a-quilt/
and also a quickie on invisible ladder stitch
http://turningturning.com/tutorial-invisible-ladder-stitch-for-quilt-binding/
This is the method I usually use on my mini quilts. If you have used hexagons you will need to make sure that the edge is big enough to cover the spaces between the edge hexes. Another way for hexagons is to applique them onto another piece of fabric and then use one of the methods to join it together.
Alternatively, you can also use the very pretty bias binding that is available or plain binding to join the front and back
together, again using an invisible ladder stitch. You can make your
own bias binding type edging as well just by cutting strips of material.
Anyway you should end up with a finished quilt that looks a bit like this
Honestly it is a lot easier than it sounds, and once you've started you won't be able to stop!
Hope you find this guide helpful and feel free to ask questions or to suggest ways of improving it! I'm a novice and not sure how it will work for you!


Thank you Debbie for this great tutorial.
ReplyDeleteYour quilt looks great!
Hugs, Drora